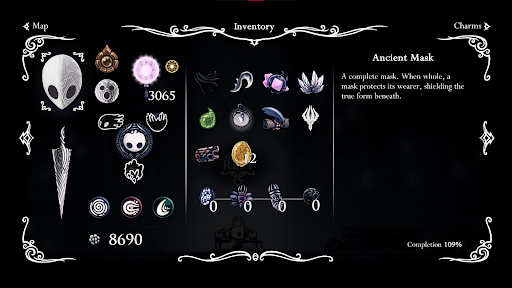
How To Get All Mask Shards
Mask shards in Hollow Knight are craftable items to completely build an Ancient Mask for your Knight, which in return grants you an increment in your health bar.
The game features 16 mask shards in total, to be acquired as a collectible, while some have to be purchased for a certain amount of geo from Sly, the NPC merchant you first encounter at the Forgotten Crossroads once you defeat the boss, Gruz Mother.
You can make 4 more ancient masks from these particular shards, which allows you to add more masks from 5 to 9, with 5 masks being the default number as you start playing the game. To build each mask, you need exactly 4 mask shards; hence, there are 16.
In-game description: A shard of an Ancient Mask, worn to protect oneself from harm. Collect more to strengthen your shell and protect yourself from damage
Mask Shards 1 + 2
Shard 1 Description: This old thing? Maybe a fragment of something larger. Still, maybe you can make some use of it.
Shard 2 Description: I found another of these. If you look closely, there is some nice engraving work on them. I suspect I undercharged last time, and this is the only one left. It’s gonna cost you!
Both can be purchased from Sly the Merchant early on set in the game from his shop in the area of Dirtmouth. Use your map to make navigation easier. The first shard costs 150 Geo and the second one 500 Geo.
To interact with Sly, you must find and save him at the Forgotten Crossroads by killing the boss Gruz Mother. Killing her off will grant you 50 Geo as a reward. Once you do that, Sly will be in a particularly small town village, dying from The Infection. Interact with him to cure his infection.
Moving forward, his Dirthmouth shop opens to buy goods, so you can start buying stuff from him then.
Mask Shards 3 + 4

Shard 3 Description: You’re collecting these, aren’t you? Well you’re in luck, I found another in my storeroom. This is the last one though, so it’s priced accordingly.
Shard 4 Description: As it turns out, I do actually have one more of these shards left. Very last one! I feel bad charging you so much for the previous shards, especially because it means I have to charge even more for this one.
Now, obtaining both of these needs a little effort from players. The Shopkeeper’s key is required for this task, which you’ll find lost in the Crystal Peak area. This key belongs to Sly, the shopkeeper merchant in Dirtmouth.
At Crystal Peak, you’ll face off for the first time with a boss called Crystal Guardian. Once you deal with it, in the same room towards the left side, ascend towards the mining area. In a quite small room towards the right side, you’ll find the Shopkeeper’s key.
Next, travel back to Dirtmouth to give the key back to Sly. As a result, you’ll get the option to purchase more items from him, including mask shards 3 and 4, which can be purchased for 800 and 1500 Geo. This brings an end to buying Mask Shards.
Mask Shard 5
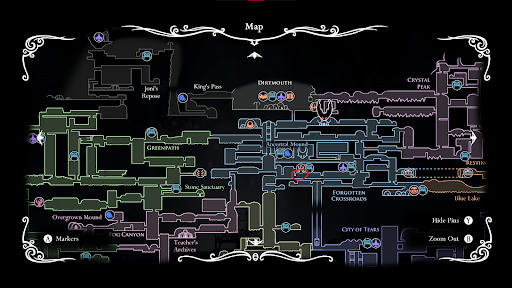
For this shard, travel to the Forgotten Crossroads, right below the area of Dirtmouth. Traverse through the Infected Crossroads and pursue a missable boss called Brooding Mawlek. You’ll find it located southwest of the Ancestral Mound. Path clearing will be required to reach that point.
The Brooding Mawlek is an infected spider that dishes out damage by oozing poison in an AOE effect. With your upgraded arsenal and skills, this boss can be easily eradicated. Once you defeat it, it will drop the required mask shard you’re looking for.
Brooding Mawlek In-game Description: Ferocious but extremely social creature. Becomes aggressive if not able to mingle with its own kind.
Also Read: How To Find All The Charms In Hollow Knight
Mask Shard 6
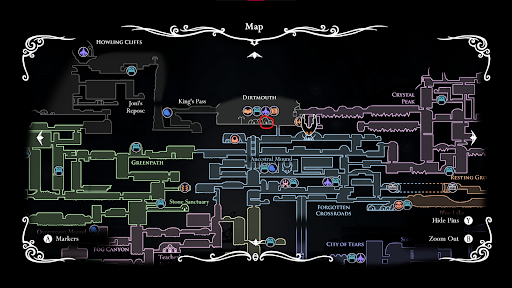
You can locate this mask shard in the same area nearby where you defeated the boss, Brooding Mawlek, previously. This time, approach North-West of the Ancestral Mound, where you’ll find an old caterpillar-figured NPC called Grubfather.
He will assign a search and rescue task for you where you have to save 5 of his Grubs. Once you do that, the Grubfather drops the mask shard as a reward for finishing his rescue mission.
Mask Shards 7 + 8
For both of these shards, you’ll need some assistance from a Mantis Claw, which is an ability of the Knight, granting it permission to execute wall climbing, ascending or descending vertically, and even jumping off from walls to land at greater heights. This skill can be located at Mantis Village.
Mantis Claw In-game Description: Claw carved from bone. Allows the wearer to cling to walls and leap off them.
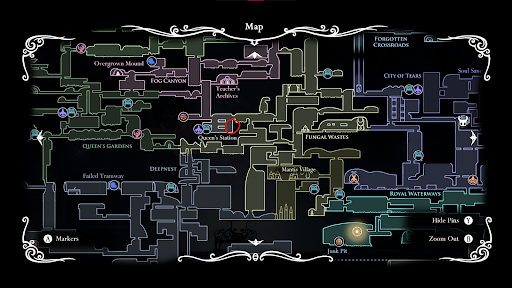
Moving forward, proceed to the area of Queen’s station and travel to the extreme east-wards. With help from the Mantis Claw, from that point, climb up the station quickly, and you’ll find the 7th mask shard nearby, a long steel level pulled towards the left side.
Furthermore, for the 8th mask shard, reach the Forgotten Crossroads and go towards the False Knight, a boss you encounter. After dealing with the boss, travel downright south and find the mask shard. Once again, the Mantis Claw will be handy in this situation for you.
Mask Shard 9
This shard is acquired as a collectible from the beetle-bug, NPC, Bretta’s home, which is located in Dirtmouth. To reach Bretta, you must first unlock her by traveling towards the Fungal Wastes area.
She’ll be located at the extreme bottom right of Mantis Village, which you can locate and navigate with the help of your map. Navigating this location will require a challenging amount of parkour maneuvering on your behalf.
Once you find Bretta, interact with her inside her home to get the mask shard.
Mask Shards 10 + 11
First things first, to acquire both of these mask shards, you will need to have Monarch Wings unlocked. This is a unique ability of the Knight, which allows you to execute a jump the second time while you are still in the air, making space for you to cover more aerial distance, which is impossible to achieve with one jump only.
This ability can be learned in the far west area of Ancient Basin. A Lumafly Lantern and a Crystal Heart are also required to get this ability. Not only that, but you also have to defeat a missable boss on the way called Broken Vessel to sweep the area completely.
Monarch Wings In-game Description: Wings of ethereal matter that shimmer in the darkness. Allows one to jump again in mid-air

Now that you have Monarch Wings at your disposal, you may proceed forward to get the Mask Shards as planned originally. The 10th shard can be obtained from the area of Deepnest via the Fungal Core inside the Fungal Wastes. It’s super close to the Mantis Lords boss.
The exact location for this shard is southwest of the Mantis Village, where you’ll have to descend directly below it to reach Deepnest.
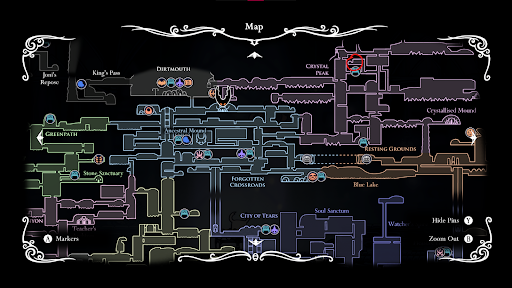
Next, for the 11th mask shard, approach the Crystal Peak. First, make sure to reach the Bench to save your in-game progress.
With the help of the Monarch Wings you acquired earlier, travel to the middle upper-east section of Crystal Peak. You‘ll be faced off against a boss called Crystal Guardian. Defeat him in this area and then process to ascend towards the area right above you.
There, you’ll fight the Crystal Guardian again for the second time. Once he is killed, on the far left dead end, collect the Mask Shard floating in mid-air.
Crystal Guardian In-game Description: Heavyset miner of the Crystal Peak overcome by Crystal Growth. It can discharge blazing beams of light from its crystallized limbs.
Mask Shard 13
For this shard, you’ll first have to purchase a Lumafly Lantern from the shop of the merchant, Sly. This will cost you 1800 geo.
Lumafly Lantern In-game Description: What’s more important? A light to guide your way, or a friend who’ll stay by your side? Why not both? Take this bright little fellow as your companion, and he’ll light your way through the thickest darkness.
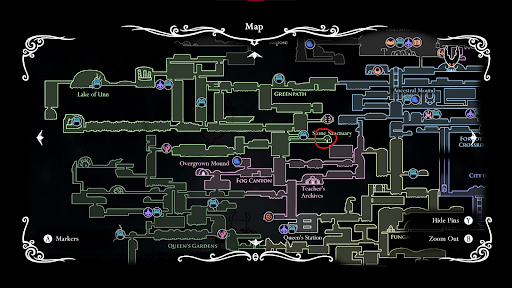
Moving forward, with the lantern at your disposal, head towards the Greenpath area and then towards the Stone Sanctuary sub-area inside it. As you enter Greenpath, proceed towards the extreme east path below, where the bench rest point is at the bottom right.
Next, go down the Stone Sanctuary from the left side of the bench. Now, you will need the Lumafly Lantern at your service to help you traverse the darker paths you cross with ease.
Not only that but you’ll also be faced with multiple enemies simultaneously, so be prepared for combat when necessary. Continue downwards from the bench, land, and travel further east of the path.
Finally, now that you have reached the extreme right of Stone Sanctuary, you will also encounter a boss called No Eyes, whom you have to defeat. Once you deal with it, proceed northeast from that particular area, and just up ahead further, a mask shard will be waiting for you to collect it.
Mask Shard 14
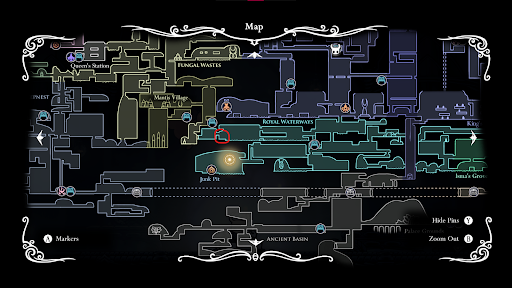
For this particular shard, you have to travel to King’s Station first. Once you arrive, travel further west until you approach the entrance for the Royal Waterways, which is made like a downwards open tunnel and is located right below King’s station.
Now that you are inside the Waterways continue on your journey further west. The path is designed in a particular way, requiring you to use your Mantis Claw and Monarch Wings to traverse the terrain with ease.
As you approach the dead end of the Royal Waterways far west, you’ll eventually be able to collect the 14th mask shard. Keep in mind, though, that enemies will be lurking in the dark while you travel this path, so be on high alert while you journey through.
Mask Shard 15
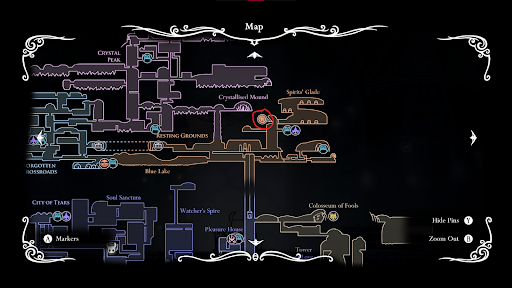
For the second last mask shard, go to the Resting Grounds area southeast of Crystal Peak. Moving forward, upon your arrival, hasten your way towards an NPC moth known as the Seer, for whom you have to obtain a total amount of 1500 essence in exchange for the mask shard she will give you as a reward. The Seer can be found due west of the Resting Grounds.
To collect this essence, you’ll have to defeat a cumulative total of 6 dream bosses, from the Failed Champion to Grey Prince Zote.
Mask Shard 16
And now, for the remaining final mask shard in Hollow Knight, there is a mission you must complete, known as the Delicate Flower Quest. To initiate the quest, go to the Resting Grounds train station zone. Next, travel westwards and normally descend down.
Moving forward, as you reach the bottom of the area, start traveling eastwards, where you’ll notice a breakable wall pointing downwards. Now, you will need the aid of 2 spells known as Desolate Dive and Descending Darkness. These spells allow you to forcefully dive underground while emitting an AOE shockwave damage upon impact.
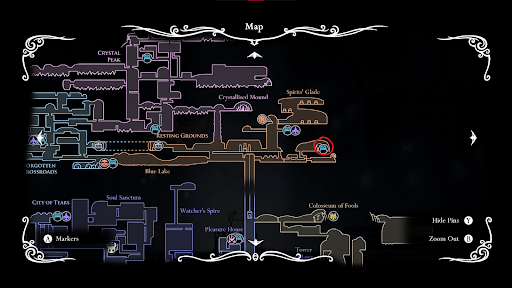
Next, continue further in the direction east until you reach a dead end. Right above you, there will be a breakable wall, which is located on top of a chest. Breach through the wall and make your way upwards until you reach the ground surface.
Once again, travel eastwards again until you come across a gigantic mansion hut. Inside, you’ll meet an NPC called Grey Mourner, from whom the Delicate Flower quest starts. She will hand you a Delicate Flower to take it at the Queen’s Gardens, where the grave of her lover, Child of the Traitors, rests.
Remember that while doing this quest, you cannot use means of transportation through teleportation or fast traveling, nor take any kind of damage otherwise, you’ll have to restart the quest again. Once you successfully finish the quest, the final mask shard is received as a reward.
Conclusion
To wrap up, we now end our guide on Hollow Knight mask shards. We sincerely hope this guide turned out useful for you. Hollow Knight has much to offer for players who especially enjoy single-player games with horror and exploration themes, so if you’re one of those gamers, you’re in for a lot of fun!