- Last Updated on
The Railgunner is one of Risk of Rain 2’s latest survivors, coming as part of the Survivors of the Void DLC. In the right hands, she’s capable of dishing out massive damage quickly, easily wiping a horde of enemies, while retaining a decent amount of mobility. To get the most out of her, you’ll need to be accurate, quick on the trigger, and fast on your feet.
Unlocking the Railgunner
Unlocking the Railgunner in Risk of Rain 2 is nice and easy, being available by default once you’ve bought the Survivors of the Void DLC. If you’re looking for a character with a bit more challenge to unlock, there is another introduced with the DLC. You’ll need to complete 50 waves in the Simulacrum for the unlock, and the second new character will be yours. As for the Railgunner, she’ll be there once you boot up the game.
Related: Risk of Rain 2 Bandit Guide
💥 Don't Miss These Latest Deals 💥
- 27 inch QHD (2560*1440) display with the DCI-P3 90% wide color gamut brings what you’re watching to life in over 16.7M colors
- Nvidia ampere streaming multiprocessors
- 2nd generation rt cores:
- 3rd generation tensor cores
- NVIDIA GeForce RTX 3070 Ti GPU
- 12th Gen Intel Core i7 14-Core CPU
- Next-Gen Vapor Chamber Cooling
The Railgunner’s abilities
Every character in Risk of Rain 2 has a couple sets of unique abilities, and the Railgunner is no different. As with the other survivors, she has one set of abilities available by default, with another set locked behind challenges.
The Railgunner’s starting abilities
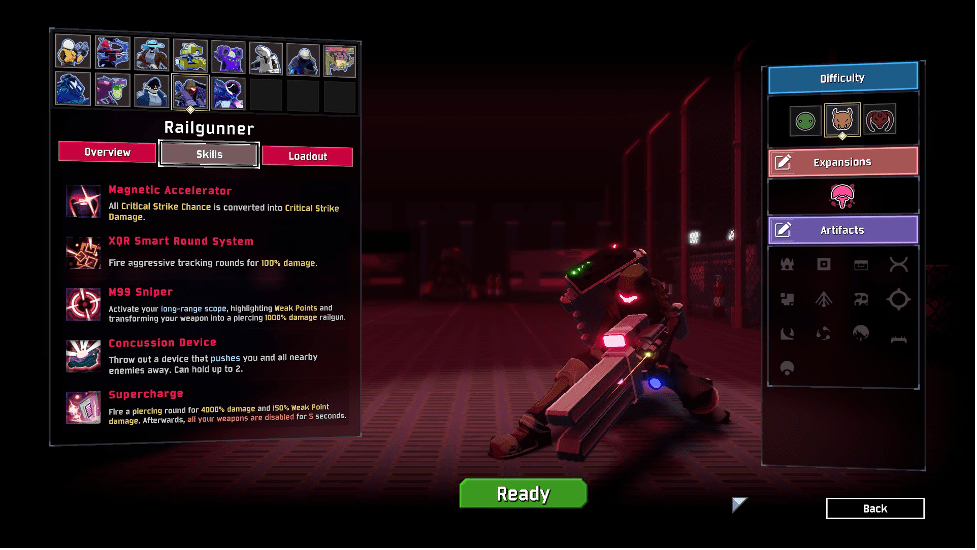
The Railgunner has five abilities to use at first, with one being passive.
1. Magnetic Accelerator:
All Critical Strike Chance is converted into Critical Strike Damage. Unlike other characters, the Railgunner does not have critical chance. Instead, this passive makes every hit on an enemy’s weakpoint deal critical damage, with no exceptions. This passive also has a secondary effect – every increase to crit chance becomes a flat increase to crit damage.
This makes crit chance items, like the Lens Maker’s Glasses or Predatory Instincts, incredibly valuable, much more so than usual. As each item boosts your damage, you can exceed 100% critical chance to infinitely stack damage buffs. In short, the Railgunner’s playstyle and item priorities revolve entirely around this skill.
2. XQR Smart Round System:
Fire aggressive tracking rounds for 100% damage. This is the Railgunner’s primary attack when not scoped in, shooting four tracking rounds similar to the Huntress. However, it’s pretty much a waste of time, and you probably won’t get much use out of it except for in fringe cases or if an enemy is too close for you to land an aimed shot.
The damage pales in comparison to the Railgunner’s secondary, and it can’t even benefit from her critical passive. Do yourself a favor and forget this skill, as every shot fired is a crit missed.
3. M99 Sniper:
Activate your long-range scope, highlighting Weak Points and transforming your weapon into a piercing 1000% damage railgun. This is the Railgunner’s real primary attack. When scoped in, enemy weakpoints will be highlighted, which will confer guaranteed criticals if hit.
You’ll deal 1000% of your base damage, plus extra crit damage when hitting a weakpoint. Every shot will proc active reload, which will grant you an additional 100% damage to your next shot if you make a perfect reload. Oh, and the shot is piercing too.
4. Concussion Device:
Throw out a device that pushes you and all nearby enemies away. Can hold up to 2. While this skill can win breathing room by pushing enemies, it’s better used as a mobility device. With a sprint and a jump, you’ll cover quite a bit of ground and gain some height.
Timed well, you can even use it to break a fall without taking damage, and your primary attack’s recoil can really send you flying. You’ll need to get into the habit of using it, as the Railgunner has no other means of mobility.
Also Read: Is Risk of Rain 2 Cross-Platform
5. Supercharge:
Fire a piercing round for 4000% damage and 150% Weap Point damage. Afterwards, all your weapons are disabled for 5 seconds. This is the coup de grace of the Railgunner’s skills. With it, you’ll easily be able to one-shot early game bosses, and late game bosses with the right items. As it’s piercing, a Supercharge can easily be used for crowd control, clearing a swarm of enemies and making the 5-second cooldown a moot point.
The Railgunner’s unlockable abilities
The Railgunner’s unlockable abilities offer a whole lot of flexibility, though you’ll probably either love them or hate them, depending on your playstyle.
HH44 Marksman:
Activate your short-range scope, highlighting Weak Points and transforming your weapon into a quick 400% damage railgun. With the right items, this ability can easily be the better of the two. Although it has lower damage, HH44 essentially turns your railgun into a DMR. It can fire two shots per second, with no reloading necessary, and attack speed items mean a faster firing rate. While it can’t benefit from the perfect reload damage buff, the right build of damage and attack speed boosting items will turn it into an accurate critical machine gun.
Polar Field Device:
Throw out a device that slows down all nearby enemies and projectiles. This ability can be useful in some circumstances, slowing down enemies and their attacks, allowing you to reposition. However, losing the Concussion Device’s mobility and niche uses isn’t really worth it, in my opinion.
Cryocharge: Freezing:
Fire a piercing round for 2000% damage. Like HH44, this skill does a lot less damage than its counterpart, though it grants the Railgunner much more flexibility. It will freeze enemies in place for a few seconds, allowing for an execution shot if they fall below 30% health. Where this is handy, Cryocharge really shines by not overheating your railgun, as the M99 Sniper shot does. Coupled with HH44 and a few good items, you’ll be able to deal enormous amounts of damage with pretty much no downtime.
Related: Risk of Rain 2 Artifacts
The Railgunner’s playstyle
The Railgunner is all about keeping your distance and dispatching enemies one by one. Though she has the Concussion Device, the Railgunner isn’t quite as mobile as other survivors. If she gets swarmed, the run is likely over. Make regular use of these Concussion Devices to create space, reposition every time it looks like you’re getting overrun, and make every shot count. With the Railgunner’s insane damage buffs, there’s no excuse for taking more than one shot for one kill.
For bosses, the approach is a little different. You can’t create distance and charge the teleporter, so you should focus on one-shotting the boss instead. With a well-placed Supercharge, it’s entirely possible even without many damage-boosting items. Time the boss’s spawn with your Supercharge coming online, and it’ll barely have enough time to look at you. Use your Concussion Devices to stay mobile until your railgun is up again, then deal with the rabble as normal.
Also Read: Risk of Rain 2 Huntress Guide
Priority items for the Railgunner
At this point, you probably already know most of the items that you should be gunning for. Still, here’s the list of what you should be looking for:
Lens Maker’s Glasses: This is top of the list, as crit chance boosting items directly increase your damage output. Though I’ve mentioned this one specifically, anything that affects crit chance is vital for a good Railgunner run.
Crowbar: Your shots should be killing an enemy in one hit. Anything less is going to kill you in the long run. The Crowbar works well with this aim, amounting to an effective 75% damage boost that stacks. Just don’t soften them up with your XQR rounds.
Ukulele: This item is essential for the Railgunner, allowing her to put down swarms with ease. Your damage will jump between nearby enemies, dealing 80% of your shot’s damage. Stack a few of these, plus a couple of other AOE items like Will-o’-the-wisp , and you’ll be pretty much unstoppable.
Shatterspleen: The Shatterspleen is the mother of all AOE items for the Railgunner. It guarantees a bleed on a critical hit, inflicting 240% of your base damage. The real kicker is that bleeding enemies explode upon death, dealing another 400% of your base damage, plus 15% of that enemy’s max health, to nearby enemies. It also stacks, for even more insane damage.
Gasoline: Another good AOE item, it causes enemies to explode, setting aflame all nearby enemies. It causes 150% base damage upon ignition, plus another 150% damage during the 3-second burn time. That said, this isn’t what gets this item on the list. It synergizes brilliantly with Ignition Tank, dealing a further 300% damage when you set enemies on fire. If you stack Gasoline Tank a few times, you’ll get a wide-reaching and very damaging AOE attack.
Harvester’s Scythe: The Harvester’s Scythe is a pretty reliable way for the Railgunner to heal. Every crit landed will heal you for 8 health each hit, which stacks at an additional 4 health per item. It also provides another 5% crit chance, which translates to a 5% damage boost for the Railgunner.
Backup Magazine: This item isn’t essential, but it does have a pretty handy effect on the Railgunner. Each Backup Magazine will let you shoot one additional M99 Sniper shot without reloading, though only the first will benefit from the perfect reload. Once you unscope, you’ll need to reload, regardless of whether you’ve fired all your shots.
Mobility items: As the Railgunner is fairly immobile without the use of the Concussion Device, you should try to grab a couple mobility items at least. Good ones are Paul’s Goat Hoof, Energy Drink, and Wax Quail.
Attack speed items: Attack speed is vital for the Railgunner if you use HH44. It’s also pretty handy for the M99 Sniper, as it enlarges the hitbox for a perfect reload, making it quicker and easier to hit. Keep on the lookout specifically for Soldier’s Syringe, Predatory Instincts, and Warbanner. Mocha is also pretty good, as it also provides a buff to movement speed.
Avoid void items like the plague, especially Lost Seer’s Lenses. A good run with the Railgunner hinges on certain items and synergies, and most void items can easily ruin that balance. Lost Seer’s Lenses will convert your crit glasses into a chance to insta-kill boss glasses, meaning a direct decline in your damage output. Polylute is also terrible, as it corrupts all Ukuleles into items that only target a single enemy. Pick it up, and you’ll be losing a great item for crowd control.
That’s pretty much everything you need to know about Risk of Rain 2’s Railgunner. With a bit of practice, she’s easily capable of being the most damaging survivor in the game, melting through bosses and mobs alike. Make sure you grab a few of the items mentioned above, and your runs will be a dream.